【Firebase】Firebase Emulatorの導入方法

Firebaseからは、Firebase Emulatorという機能が提供されています。
これはFirebaseの各種サービス(Cloud FirestoreやFirestorage、Authなど)の挙動をローカル環境でシュミレートできるものです。
エミュレーターを使用するメリットとして、下記が挙げられます。
- ローカル環境で実際のFirebaseに接続することなくFirebaseの機能を使用できる。
- 意図せず課金が高くなってしまうような処理をローカル環境で発見できる(エミュレータなので料金がかからない)
- テストの自動化を行いやすい
本記事では、Firebase Emulatorの導入方法を説明していきます。
firebase-toolsをインストールし初期化する。
firebase-toolsのインストール
Firebase Emulatorはfirebase-toolsをインストールすることで利用できるようになります。
これは、FirebaseをCLI上で操作できるようになるツールです。
まずは、下記コマンドでインストールを行います。
bash1npm i firebase-tools -g
firebase-toolsをインストールする際に、CLIスクリプトを利用したcurl -sL firebase.tools | bashがFirebaseのドキュメントに記載されている場合があります。
この方法でインストールすると内部的にはNodeもインストールされるようです。
ただ、CLIスクリプトでインストールしたNodeのバージョンだと、エミュレーター起動時にエラーになります。
必ず npm i firebase-tools -g のnpm経由でインストールするように注意してください。
上記問題に関する情報は下記のissueに記載があります。
グローバル環境にインストールしたくない場合は、適宜オプションを変更してください。
例えば、下記です。
bash1npm i firebase-tools -D
インストールされたことを確認します。
bash1npx firebase-tools --version
2
313.11.2
4
5npx firebase --version
6
713.11.2
バージョン情報が確認できればOKです。
firebaseの初期化
次にfirebaseをCLI上から操作できるように初期化を行います。
bash1firebase init
何点か質問がくるので答えていきます。
私の場合は、下記で選択しました。
bash11. Which Firebase features do you want to set up for this directory? Press Space to select features, then Enter to confirm your choices.
2
3どのサービスを使用するかを選択します。
4今回はエミュレーターを使用したいので Emulators: Set up local emulators for Firebase products を選択します。
5
62. Please select an option
7
8接続するFirebaseのプロジェクトの種類を選択します。
9選択肢は下記です。
10
11Use an existing project
12Create a new project
13Add Firebase to an existing Google Cloud Platform project
14Don't set up a default project
15
16既存のプロジェクトを使いたかったので、 Use an existing project を選択しました。
17
183. Select a default Firebase project for this directory
19
20接続するFirebaseのプロジェクトを選択します。
21
224. Which Firebase emulators do you want to set up? Press Space to select emulators, then Enter to confirm your choices.
23
24どの機能をエミュレートするかを選択します。(複数選択可)
25今回は Cloud Firestore をエミュレートしたかったので、Firestore Emulator を選択しました。
26
275. Which port do you want to use for the firestore emulator? (8080)
28
29エミュレートする機能のポートを設定します。デフォルトの8080を設定しました。
30
316. Would you like to enable the Emulator UI? (Y/n)
32
33Emulator UI を使用するかどうかを選択します。
34Emulator UI とはエミュレーターの各種データの確認などをブラウザ上から確認できる機能です。
35今回は使用したかったので「Y」を選択しました。
36
377. Which port do you want to use for the Emulator UI (leave empty to use any available port)?
38
39エミュレーターUIにアクセスする際のポートを設定します。デフォルトは4000になります。
40デフォルトで問題なければそのままエンターキーを押します。
41
428. Would you like to download the emulators now?
43
44エミュレーターをすぐにダウンロードするかを設定します。 Y を選択。
45
質問に答えると、初期化されてエミュレーターを使用できるようになります。
下記のようにコンソールに表示されればOK。
bash1i  Writing configuration info to firebase.json...
2i  Writing project information to .firebaserc...
3i  Writing gitignore file to .gitignore...
4
5✔  Firebase initialization complete!
初期化後は以下のファイルが生成されます。
.firebaserc1{
2  "projects": {
3    "default": "xxx"
4  }
5}
firebase.json1{
2  "emulators": {
3    "firestore": {
4      "port": 8080
5    },
6    "ui": {
7      "enabled": true
8    },
9    "singleProjectMode": true
10  }
11}
.gitignore1# Logs
2logs
3*.log
4npm-debug.log*
5yarn-debug.log*
6yarn-error.log*
7firebase-debug.log*
8firebase-debug.*.log*
9
10# Firebase cache
11.firebase/
12
13# Firebase config
14
15# Uncomment this if you'd like others to create their own Firebase project.
16# For a team working on the same Firebase project(s), it is recommended to leave
17# it commented so all members can deploy to the same project(s) in .firebaserc.
18# .firebaserc
19
20# Runtime data
21pids
22*.pid
23*.seed
24*.pid.lock
25
26# Directory for instrumented libs generated by jscoverage/JSCover
27lib-cov
28
29# Coverage directory used by tools like istanbul
30coverage
31
32# nyc test coverage
33.nyc_output
34
35# Grunt intermediate storage (http://gruntjs.com/creating-plugins#storing-task-files)
36.grunt
37
38# Bower dependency directory (https://bower.io/)
39bower_components
40
41# node-waf configuration
42.lock-wscript
43
44# Compiled binary addons (http://nodejs.org/api/addons.html)
45build/Release
46
47# Dependency directories
48node_modules/
49
50# Optional npm cache directory
51.npm
52
53# Optional eslint cache
54.eslintcache
55
56# Optional REPL history
57.node_repl_history
58
59# Output of 'npm pack'
60*.tgz
61
62# Yarn Integrity file
63.yarn-integrity
64
65# dotenv environment variables file
66.env
67
エミュレーターを起動する。
初期化が完了したら、エミュレーターを起動します。
bash1npx firebase emulators:start
2
3i  emulators: Starting emulators: firestore
4⚠  firestore: Cloud Firestore Emulator does not support multiple databases yet.
5⚠  firestore: Did not find a Cloud Firestore rules file specified in a firebase.json config file.
6⚠  firestore: The emulator will default to allowing all reads and writes. Learn more about this option: https://firebase.google.com/docs/emulator-suite/install_and_configure#security_rules_configuration.
7i  firestore: Firestore Emulator logging to firestore-debug.log
8✔  firestore: Firestore Emulator UI websocket is running on 9150.
9i  ui: Emulator UI logging to ui-debug.log
10
11┌─────────────────────────────────────────────────────────────┐
12│ ✔  All emulators ready! It is now safe to connect your app. │
13│ i  View Emulator UI at http://127.0.0.1:4000/               │
14└─────────────────────────────────────────────────────────────┘
15
16┌───────────┬────────────────┬─────────────────────────────────┐
17│ Emulator  │ Host:Port      │ View in Emulator UI             │
18├───────────┼────────────────┼─────────────────────────────────┤
19│ Firestore │ 127.0.0.1:8080 │ http://127.0.0.1:4000/firestore │
20└───────────┴────────────────┴─────────────────────────────────┘
21  Emulator Hub running at 127.0.0.1:4400
22  Other reserved ports: 4500, 9150
23
24Issues? Report them at https://github.com/firebase/firebase-tools/issues and attach the *-debug.log files.
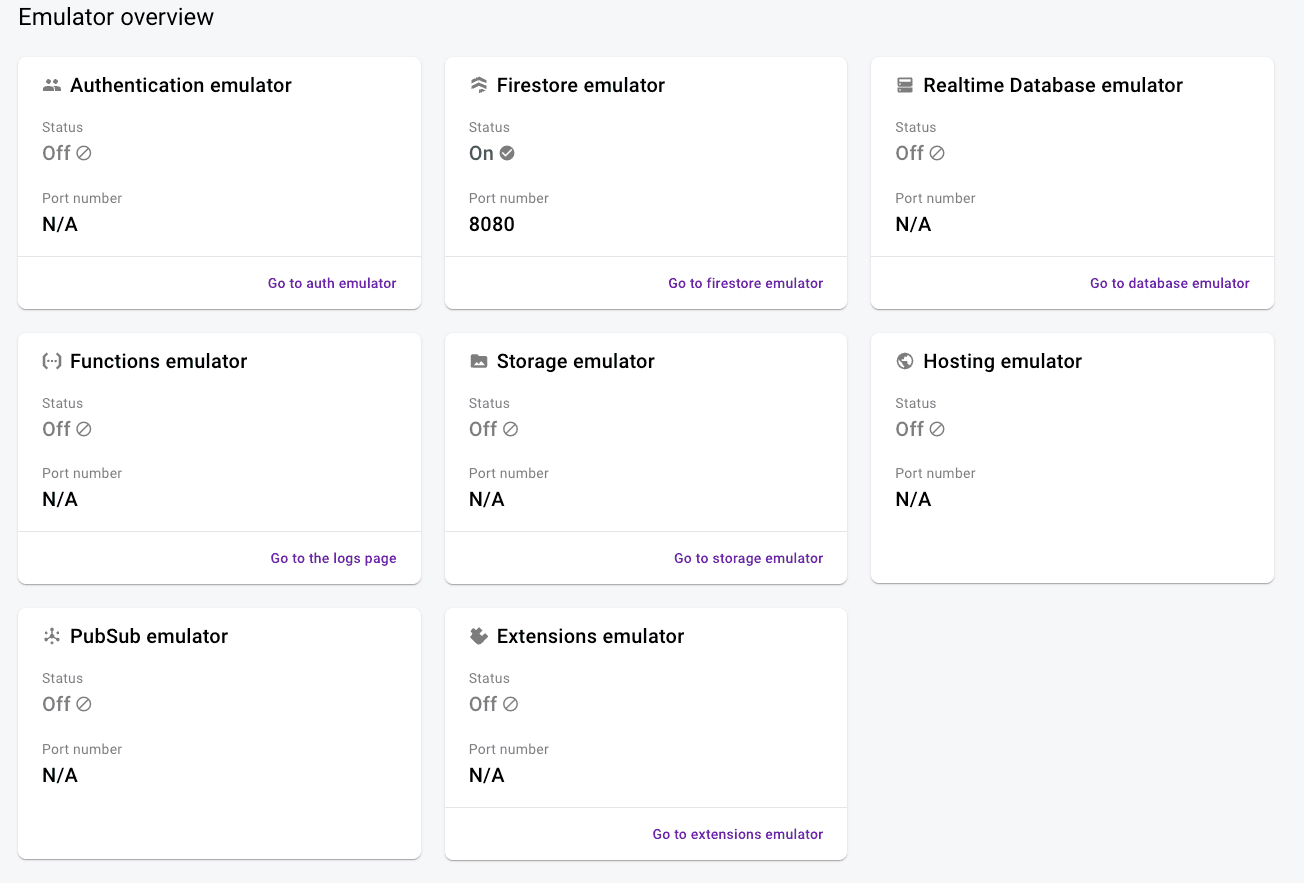
この状態で、http://localhost:4000/にアクセスできればうまくいっています。

今回はColud Firestoreをエミュレートしたので、上記のFirestore emulatorから入ることができます。

もちろんデータを生成することも可能です。

エミュレーター内のデータの永続化
今回は、Cloud Firestoreのエミュレーターを使用しましたが、生成したデータはエミュレーターを閉じるとリセットされてしまいます。
エミュレーター起動時に下記のオプションを設定することでこの問題を回避できます。
bash1npx firebase emulators:start --import data --export-on-exit
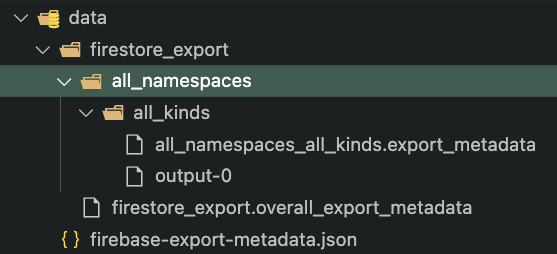
すると下記のようにdataディレクトリにエミュレーター内のデータが保存されます。

次回起動時にもnpx firebase emulators:start --import data --export-on-exitとコマンドを打って起動すれば前回のデータにアクセスすることができます。
ただ毎回npx firebase emulators:start --import data --export-on-exitと打つのは大変なので、package.jsonにコマンドを登録しておくと便利です。
package.json1{
2  ...
3  "scripts": {
4    "dev:firestore": "npx firebase emulators:start --import data --export-on-exit"
5    ...
6  },
7  ...
8}
ローカル環境時にエミュレーターに接続させる
ここまでで、エミュレーターを起動されることができました。
最後に、ローカル環境で開発しているときはエミュレーターに接続するようにすれば完了です。
Firebaseの各機能ごとにエミュレーターに接続する関数がSDKから公開されているのでローカル環境時にはそれを使用するようにします。
SDKをインストールしていない場合は下記でインストールしておいてください。(javascriptの例になります。)
bash1npm install firebase
今回は、Cloud Firestoreのエミュレーターを使用しているのでそれ用の関数を使用することになります。
使用する関数はconnectFirestoreEmulatorになります。
connectFirestoreEmulatorのインターフェースは下記になります。
connectFirestoreEmulator(Firestore, エミュレーター接続ホスト(文字列), エミュレーター接続ポート(数字))
接続ホストと接続ポートはfirebase.jsonに記載されているhostとpostの値になります。
今回は下記のようになっているので、ホストは'127.0.0.1'でポートは8080になります。
firebase.json1{
2  ...
3  "emulators": {
4    "firestore": {
5      "port": 8080,
6      "host": "127.0.0.1"
7    },
8    ...
9  }
10}
下記がjavascriptSDKを利用してローカル環境時にエミュレーターに接続する例になります。
この例では、どの環境で動いているかの情報を環境変数に格納してその値をみて、ローカル環境か本番環境かを判定します。
ローカル環境の場合
.env(ローカル)1ENVIRONMENT="Local"
本番環境の場合
.env(本番)1ENVIRONMENT="Production"
以下はローカル環境下ではエミュレーターに接続するコード例になります。
js1import { initializeApp } from 'firebase/app';
2import { collection, connectFirestoreEmulator, getDocs, getFirestore } from "firebase/firestore";
3
4const ENVIRONMENT = process.env.ENVIRONMENT; // 環境変数からどの環境かの情報を取得する。ローカル環境の場合はLocalの値が入る
5
6// Firebaseの設定
7const firebaseConfig = {
8  apiKey: process.env.FIREBASE_API_KEY,
9  authDomain: process.env.FIREBASE_AUTH_DOMAIN,
10  projectId: process.env.FIREBASE_PROJECT_ID,
11  storageBucket: process.env.FIREBASE_STORAGE_BUCKET,
12  messagingSenderId: process.env.FIREBASE_MESSAGING_SENDER_ID,
13  appId: process.env.FIREBASE_APP_ID,
14};
15const app = initializeApp(firebaseConfig);
16
17// Firestoreの取得
18const db = getFirestore(app);
19
20if (process.env.ENVIRONMENT === "Local") {
21   // ローカル環境の場合にエミュレーターに接続する
22  connectFirestoreEmulator(db, '127.0.0.1', 8080);
23}
24
25const articles = collection(db, 'articles');
26const articlesSnapshot = await getDocs(articles);
27const result = articlesSnapshot.docs.map((a) => {
28  return a.data();
29})
30
31console.log(result);
エミュレーターでは下記のデータが登録されています。

この状態で、console.logの部分でエミュレーターのデータが取得できていればOKです。
console.logで取得できたデータは下記になります。
bash1[
2  {
3    createdAt: Timestamp { seconds: 1718534774, nanoseconds: 790000000 },
4    userType: 'guest',
5    url: 'https://example.com',
6    title: 'tset!!!!!!!!!!!'
7  }
8]
ちゃんとエミュレーターのデータが取得できました。